

Last Updated on 5 September, 2026 by Elby | The Tasteful Pantry
This easy classic arancini recipe with mozzarella and tomato sauce has everything you want from a good arancini: a crisp golden crumb, creamy parmesan risotto and a melted mozzarella centre. The rice balls are served over a simple garlicky tomato sauce, giving you crunch, soft rice, rich cheese and tangy tomato in every bite. There are a few stages involved, but each one is straightforward, and much of the preparation can be done ahead.
How to Make Arancini
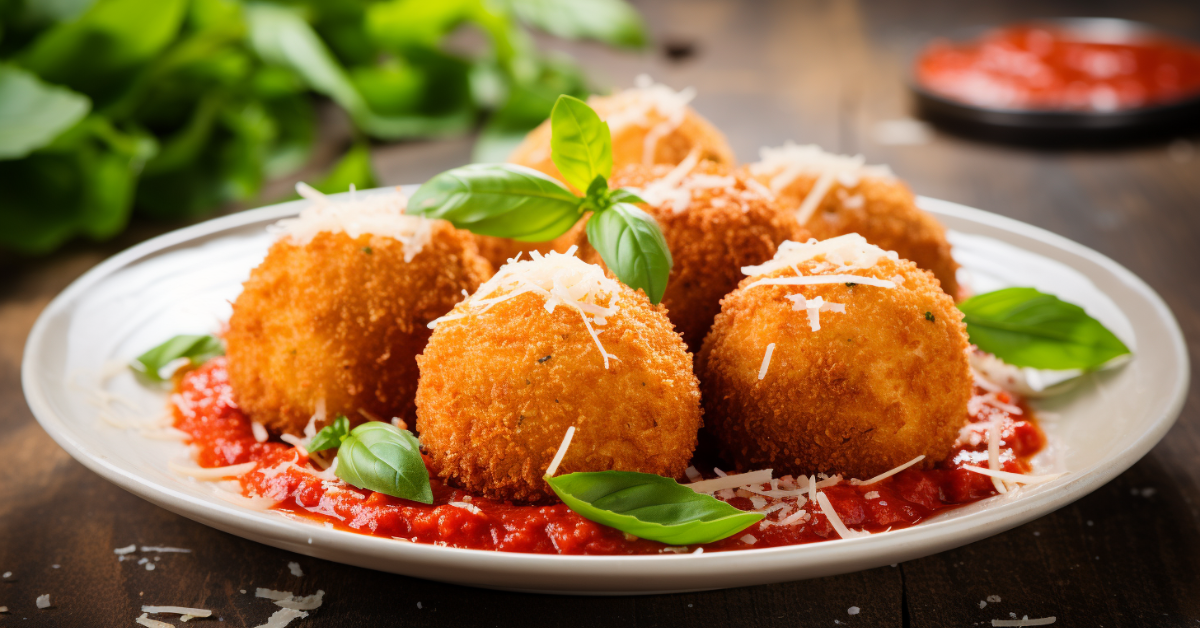
The classic Italian arancini recipe consists of cold risotto – stuffed, rolled, crumbed and fried. Served on a tomato-based sauce and topped with parmesan and basil.
Risotto
This is a baked risotto with a little onion, garlic and basil, finished off with parmesan and butter. A vegetarian dish that doesn’t leave you feeling like something is missing. That said, while the arancini are tasty with no additions, you can change them up by adding some finely diced bacon or chilli (or both) or how about a little lemon rind. But whatever you add, make sure the pieces are small.
Sauce
The sauce is simple, but flavoursome. A quick blitz of the ingredients and a simmer in the pan is all it takes, and this can be happening while you are rolling the arancini. The balance of sweet, tart and savoury in the sauce works perfectly with the cheesy arancini.
Arancini
Wet your hands and place a spoonful of the cold risotto into the palm of one hand. Press a cube of mozzarella into the middle, fold the rice around it and roll gently between your palms. This should form a tight ball of risotto with the mozzarella hidden in the middle. I like my arancini to be approximately 3-4cm in diameter. You can make them bigger, but remember they will need to cook a little longer to ensure the cheese melts and the rice is heated through. Repeat with the remaining rice and mozzarella – wetting your hands as you go.
Next set up your ‘breading’ station. Place three bowls on the bench. Combine the flour, salt and pepper in one. In the second, use a fork to beat the eggs. And panko breadcrumbs go in the third. Next for the fun part.
Coat a risotto ball in the flour, shaking off any excess. Then dip in the egg, making sure to completely coat it. Then transfer to the breadcrumbs, turning the ball and lightly pressing the crumbs so they stick – completely coating the outside of the ball. Repeat this process for all of the arancini.
Cook the arancini in approximately 1cm deep hot oil. Turning when brown until the arancini are golden brown all over. Don’t overcrowd the pan. If you’re using a small pan transfer the cooked arancini to a cooling rack sitting on a tray, and place in a warm oven while the remaining arancini cook.
Serving Arancini
Spoon the hot tomato sauce mix onto a serving platter. Pile the arancini on top and sprinkle with shredded or torn basil leaves and grated parmesan cheese. Or serve individual servings on a plate as an appetiser. Enjoy!

Tips for Making Arancini
- Cooling the risotto: Make sure your risotto is completely cool before forming the arancini. This makes it easier to handle and prevents the balls from falling apart. I’ll often make a double batch and have risotto one night and arancini the next.
- Cheese options: While mozzarella is a classic filling, feel free to experiment with other cheeses like provolone or fontina for a twist!
- Choose the right oil: don’t use olive oil! My preference is canola. Vegetable oil is also good.
Why You’ll Love This Italian Comfort Food
- Perfect for sharing: Classic arancini are great for parties, as an appetiser, or even as a fun dinner with a salad on the side.
- Creamy inside, crispy outside: The combination of creamy risotto and melty mozzarella contrasts perfectly with the crispy breadcrumb coating.
- Simple ingredients, big flavours: The tomato-based sauce adds a tangy, savoury punch that complements the rich rice balls.

Classic Arancini Recipe FAQ
What type of rice works best for arancini?
Arborio rice is ideal because of its high starch content, which helps the risotto stick together when shaped into balls. Other short-grain risotto rice like Carnaroli also works beautifully.
How do I keep arancini crispy?
Drain the fried arancini on a wire rack instead of paper towel, which prevents steam from softening the crust. If you’re making them in batches, keep them warm in the oven (around 150°C) while finishing the rest.
What can I serve with arancini?
They’re delicious with the simple tomato sauce, but also pair nicely with aioli, pesto, or a light salad.
What’s the best oil for frying arancini?
Use a neutral oil with a high smoke point, such as canola, vegetable, or sunflower oil. Avoid olive oil, which can burn at high temperatures.
Can I use leftover risotto to make arancini?
Yes! That’s the best way to make them – turn last night’s risotto into today’s arancini dinner. A great way to reduce waste and save time
How do I stop the rice from sticking to my hands when rolling?
Wet your hands slightly before shaping each ball.
Feedback and More: Did you try the classic arancini recipe? Drop a star rating ⭐⭐⭐⭐⭐ or leave a comment below to share your thoughts. Cheers, Elby!
Make mealtimes easy with more dinner ideas, one pan and one pot meals and delicious weeknight dinners.
Also, follow The Tasteful Pantry on Instagram, Facebook and Pinterest for all the latest recipes and info.
Classic Arancini
*Note: Adjusting servings will not adjust the ‘light grey’ quantities
Ingredients
Risotto (Rice Mix)
- 2 tsp unsalted butter
- 2 tsp olive oil
- 1 onion - finely diced
- 2 cloves garlic - minced or finely chopped
- 1 ½ cups arborio rice
- ½ cup white wine
- 3 cups vegetable stock
- ¼ tsp pepper
- 30 grams parmesan cheese - grated
- 30 grams unsalted butter - roughly chopped
- 1 tbsp fresh basil - shredded
Sauce
- 2 tsp olive oil
- 2 cloves garlic
- 400 grams tinned tomatoes - crushed or diced
- 1 tsp sugar
- salt and pepper - to taste
Making the Arancini
- 1 cup flour - plain, all purpose
- ½ tsp salt
- ¼ tsp pepper
- 2 eggs
- 1 ½ cups panko breadcrumbs
- 50 grams mozzarella - cut into 1cm cubes
- 2 cups oil - canola or vegetable, for frying
- fresh basil - chopped, optional
- parmesan cheese - grated, optional
Instructions
Risotto (Rice Mix)
- Preheat the oven to 180°C | 160°C fan forced.
- Heat the butter and oil in a large ovenproof casserole pot (see notes). Add the onion and garlic and sauté until soft and fragrant.
- Stir in the arborio rice, toasting for 2 minutes or until it becomes slightly translucent. Then pour in the white wine, letting it simmer and reduce.
- Add the stock and bring to the boil. Remove from the heat, cover and place in the oven. Cook for 25-35 minutes, or until liquid has absorbed and the rice is tender.
- Season with pepper and stir in the grated parmesan, butter, and fresh basil.
- Refrigerate until the risotto has cooled completely – at least 1-2 hours or even overnight.
Sauce
- Blitz the tomatoes and garlic in a food processor.
- Heat the oil in a small saucepan over medium heat and carefully add the tomato mix. Simmer for 15-20 minutes.
- Stir in the sugar and season with the salt and pepper.
Making the Arancini
- Wet your hands and place a spoonful of the cold risotto into the palm of one hand. Press a cube of mozzarella into the middle and gently fold the rice around the cheese to form a ball. They should be approximately 3-4cm in diameter. Repeat with the remaining rice and mozzarella – wetting your hands as necessary, as you go.
- Lay three bowls on the bench. Combine the flour, salt and pepper in one. Beat the eggs in the second. Place the panko breadcrumbs in the third.
- Coat a risotto ball in the flour, shaking off any excess. Then dip in the egg, making sure it is completely coated. Transfer to the breadcrumbs, turning the ball and lightly pressing the crumbs so they stick – completely coat the outside of the ball. Repeat this process for the remaining .
- Heat oil, 1cm deep, in a pot or pan. When hot (approximately 350°F | 177°C) carefully place the balls into the oil. Turning when lightly brown (every minute or so) until the arancini are golden brown all over. Don't overcrowd the pan. If you're using a small pan transfer the cooked arancini to a cooling rack sitting on a tray, and place in a warm oven while the remaining arancini cook.
- Serve your arancini warm on top of the tomato sauce. Sprinkle extra grated parmesan and fresh basil over the top.
Notes
Nutrition
*Nutrition and calorie figures are estimates only.